Sustainability

Modern Camp: 3 Things to Consider When Building in a Hazard Area

The percentage of the US population projected to live near a coast is expected to approach 50% by 2020. The draw of these places is clearly stronger than the fear of the growing dangers generated by a heating and rising ocean - a testament to the inevitability of coastal architecture's importance.  Building to co-exist with hazards has created great architecture throughout history.  We think that good buildings respond to disaster not by retreating from it, but adapting to and learning from disaster; and that resiliency is what ultimately makes a place great over time.  This is the first in a series on our study for the Modern Camp, a prototype for development in a changing coastal Louisiana and the importance to not reacting to hazards, but to owning and integrating them into a design.

1. ELEVATION

Crucial to all development in coastal Louisiana, and increasingly the coastal United States, is the elevation of the structure above the constantly shifting, and sometimes sinking, ground.  FEMA guidelines are a good place to start, but many cities and parishes are looking at these as minimums that may be appropriate now, but insufficient in the future.  Local governments may require a set distance ABOVE what's already required by FEMA - this is called 'freeboard'.  Depending on where you are, your elevation could be the top of your lowest floor, or the bottom of your floor structure (if elevated).  A good starting point to check the status of land you're looking to build on is LSU's Flood Maps project.  In our case we have a minimum elevation of 11 feet, on land that is generally around 2 feet, creating a challenging opportunity to address a welcoming entry to a home 9+ feet off the ground.

03final.jpg

To avoid having the gigantic staircase look of many elevated camp homes, we decided to break up the upward travel into segments.  Grading the site to get a higher starting point, we have an initial ramp to an elevated platform, from which you can choose which entry to use.  One ramps up towards the bayou views and the dog-trot guest house, while the stair entry heads around toward the main house entrance.  The natural inlet is spanned with a boat house structure that provides access from both the boat's raised storage position and fully lowered position.

2. STRUCTURE

FEMA published a residential guide in 1984 (FEMA 54) and an updated version in 2010 (FEMA 4969) that outlines general best practices for building homes in high-risk coastal areas.  Some of these principles can be seen already employed in vernacular camp design in the area.  Piles extending up and through an elevated floor, for example, provides a rigid structure tied together by the floor structure than can be braced beneath the floor with sufficient room and protection.  As piles are already generally needed throughout the Louisiana coast, continuing this structural system above ground makes sense.  Locating the piles outboard of exterior wall envelopes alleviates some of the tolerance issues with locating piles exactly where walls need to go.  Cantilevers for exterior walkways is an old strategy for increased efficiency when using a pole-frame system - less piles, more floor area.  The guides are a good primer on basic strategies to consider with regards to site, structure and systems in a hazardous and changing environment.

05final.jpg

3. PROTECTION

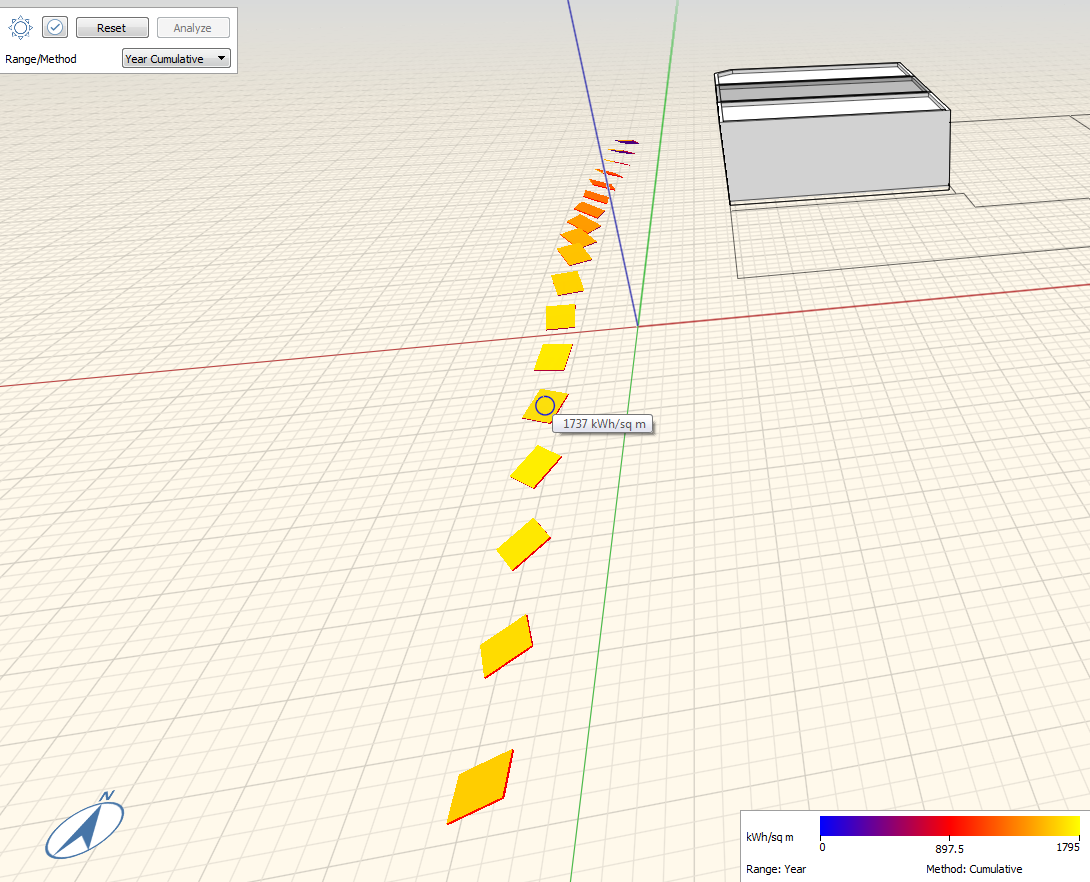
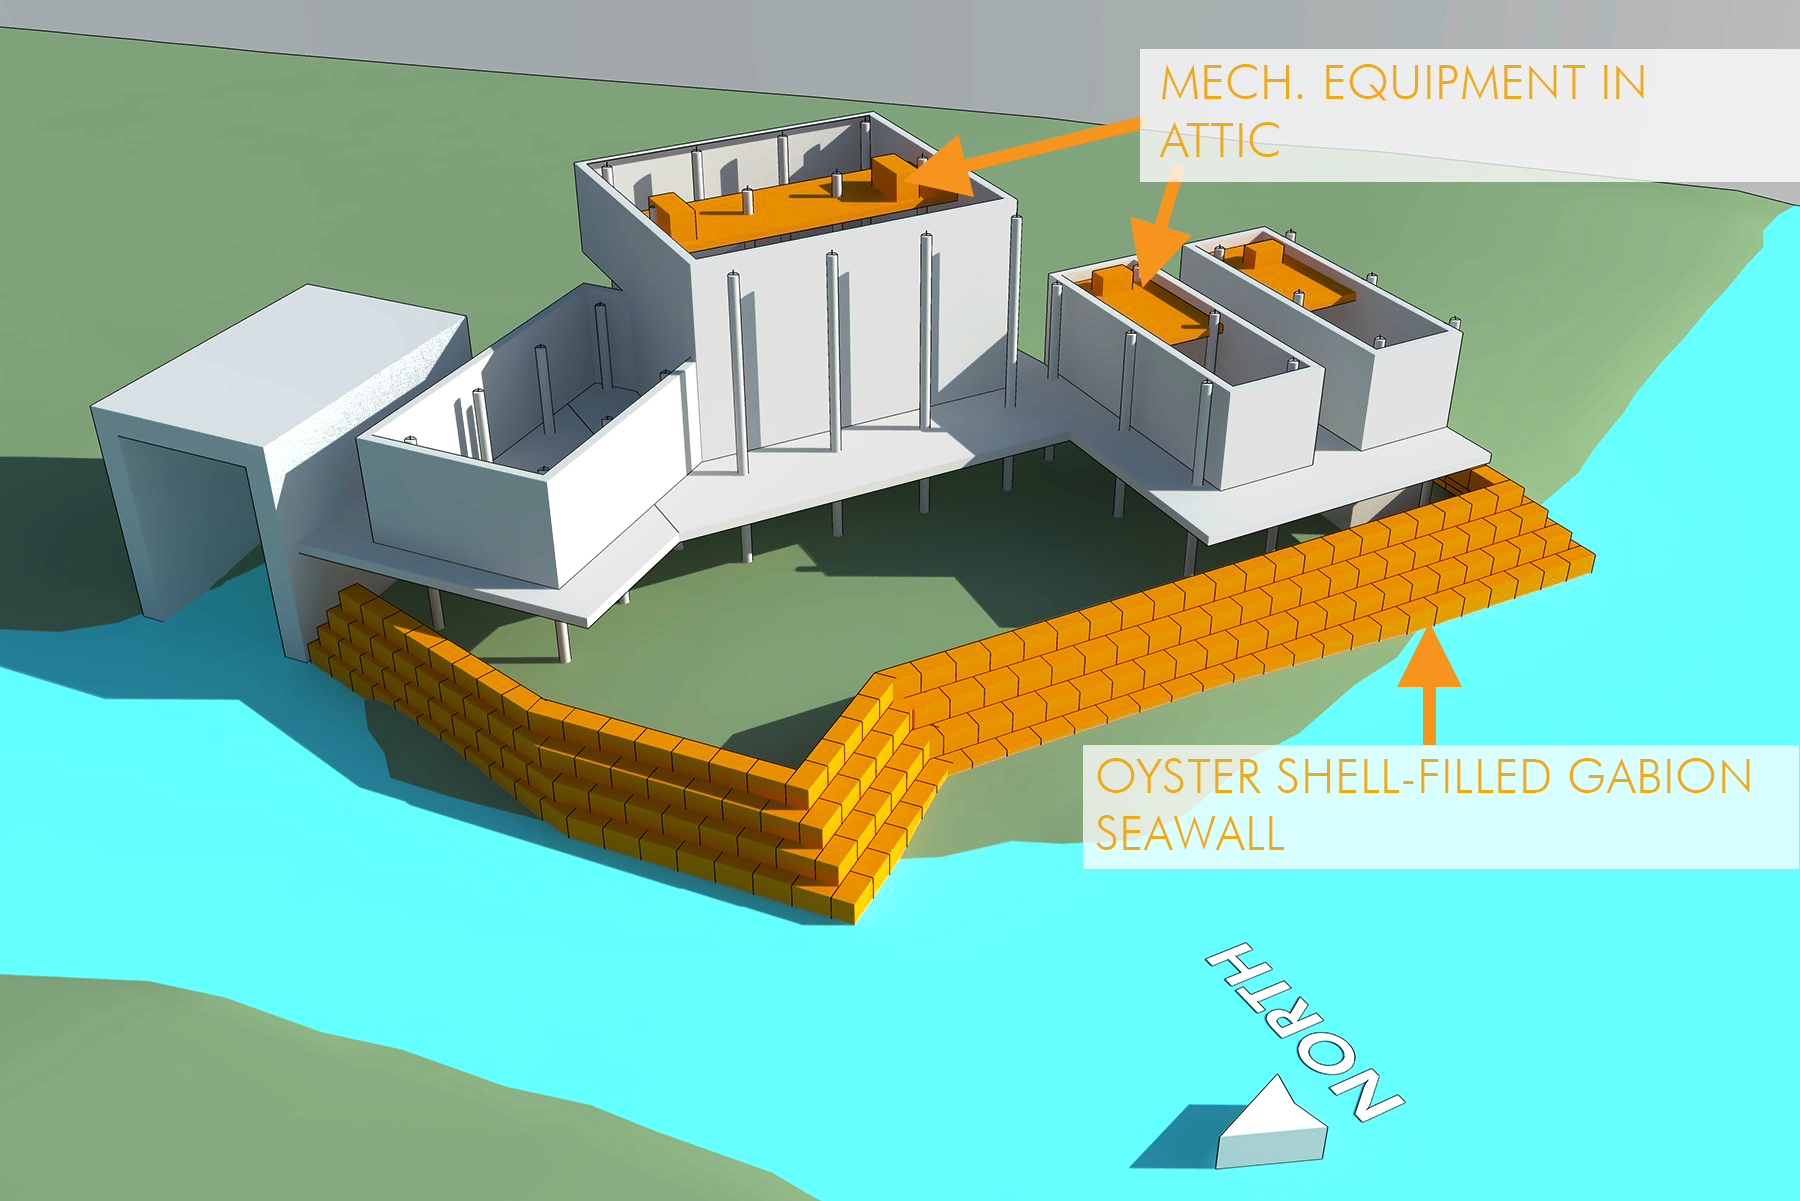
In an emergency situation, with surging water, protection of what cannot be elevated is important.  Siting behind natural berms and breakwaters is the cheapest option, but in order to site the building with water access, construction of a barrier will be necessary.  Many of the homes along the bayou utilize sheet piling to retain the land and hold back the water, however, the issues here are evident in the many rusted out walls that can be seen.  Steel and maritime environments do not mix without significant expense.  Oysters do, however.  In a strategy already deployed in many places along the Delta, oyster shells from restaurants are collected and repurposed as ballast for open cages called gabions, typically filled with rocks for civil projects at inland locations.  These oyster-shell filled gabions are an effective seawall and protect the structure below flood elevation, as well as an utility lines, vegetation, vehicles, or anything that has to remain at grade.  Any equipment that can be located high, is located high by using space-efficient systems in attic space, well above the reach of flood waters.

We'll continue later with our strategies on both passive and active energy efficient design in our series on our study of the Modern Camp!

Subscribe to the Studio BKA newsletter!

* indicates required

Getting Started with Energy Modeling

Additional service lists are kind of like the list of extra toppings on the menu when you get a burrito.  They seem like nice things, but hey, you’re on a budget, and do you really need guacamole?  Unless you’re ordering a government burrito with mandatory guacamole and extra cheese, you’d be more inclined to pass.

Energy modeling is one of those formerly “guacamole-level” extra services that is fast becoming a standard, not a small part due to the fact that BIM and cloud computing trends are allowing the design team access to what was once a prohibitively intensive engineering exercise, and earlier in the process than ever.  The days of shipping this task out to a specialized consultant that is not familiar with the design concepts and intents should be numbered.

Wading into the swamp of regulations, modeling engines, measurement standards and codes can be daunting, and even if you were fluent in such things a few years ago, the field is changing so quickly that you may have missed some things.  Having taken the LEED exam 7 years ago, I can attest to that.

How do I start?

To make a plan, you have to know where you are and where you want to be.  This means identifying your local requirements, and then setting goals for the project; or more simply: What do I have to do, and what do I want to do?

If you’re not familiar with your local requirements, a good place to start is with the DoE:  https://www.energycodes.gov/status-state-energy-code-adoption

There may be local requirements that one-up the state adopted codes, such as New York City’s Local Law 85, so be sure to check with local approval entities.  States will either adopt ASHRAE 90.1 versions directly, or the corresponding IECC (International Energy Conservation Code) which allows either ASHRAE 90.1 or its own prescriptive requirements to be used.  ASHRAE 90.1 updates are issued every 3 years (2007, 2010, 2013…) and 2 years later, IECCs are updated (2009, 2012, 2015…).

So you know where to start, but how far you want to go?

First we have to quantify distance and orient ourselves in terms of scale.  One very helpful metric that does exactly this is EUI (Energy Use Intensity).  Measured in energy used per square foot per year, it goes a long way in leveling the data of very different buildings to give you at least some hope of a meaningful comparison.  This kind of data is being collected on existing buildings by several entities and some are available to sort through such as

The DoE’s Building Performance Database - allows you to filter lots of data on existing buildings by many useful criteria, though some regions are better represented than others:
https://bpd.lbl.gov/#explore

The New Buildings Institute - collects projects that seek to be leaders in energy efficiency, less a look at standards and more at goals:
http://newbuildings.org/resource/getting-to-zero-database/

ASHRAE 90.1 - uses DoE data to establish benchmark EUIs for different building types, with the intent being to display what compliance with 90.1 meant at a certain time.
http://cms.ashrae.biz/EUI/

When you sort EUIs by Climate Zone and Building Type, all of a sudden you have a very useful means of measurement specific to your project.  Another benefit of EUI, is that you can plug in energy costs of your region and get a much more persuasive unit of measurement:  $$$.

So how far do you want to go?  It depends on your client’s motivation and while it may be marketability or a sense of civic responsibility, it is likely tied to performance savings.  At the concept stage, you can introduce these tools to display the benefits in a more concrete way.  
Once everyone is on board, you will need to pinpoint a destination.  Some predefined destinations include:

LEED ratings:  The current LEED uses ASHRAE 90.1-2010 as its reference point, setting its requirements as the minimum, and linking percentages exceeded to points in its rating system.
http://www.usgbc.org/leed

The 2030 challenge:  An architect-led initiative that works with the building design and planning industry and governments towards the goal of carbon-neutrality by 2030.  In a white paper, they define goals relative to existing codes and rating systems:
http://www.architecture2030.org/files/2030Challenge_Codes_WP.pdf

Design to Earn the EPA Energy Star:  The same Energy Star program your microwave participates in has its own building rating system that heavily utilizes EUI, and emphasizes energy use of a facility exclusively, as compared to LEED which is a much more holistic and vertically-integrated view on green buildings.  Still, Energy Star goals can be used to inform how efficient a project is aiming to be.
https://portfoliomanager.energystar.gov/pdf/reference/US%20National%20Median%20Table.pdf

You may have less specific motivations, more along the lines of performance and monetary payback.  If you don’t shoot for a Brand Name™ energy goal, once again EUI can serve as a concrete monetized target to shoot for.

So you know how to start, and where you’re going, but how do you get there?

Short answer: with an energy model.  As the design process progresses, you can enlist your MEP to head this up, but for architects, the initial siting and form-making fun may happen before one is even on board - or on small or competition projects, you may not have the luxury!  

The options for how to execute this seem numerous and scattered.  I found this chart published by the Building Codes Assistance Project extremely helpful in sorting out options:

The BCAP also does a great job of aggregating resources for architects and discussing in detail codes, processes, and industry dilemmas on most of the things I’ve touched on here.  This white paper is a good place to start:  http://bcapcodes.org/compliance-portal/design/energy-modeling/

Now more than ever, it's important to get educated and share these values at every opportunity you have to influence the built environment.  

Solar Analysis with Autodesk FormIt 360

I’m always looking out for new solutions for freeform digital design that can plug-in easily to Revit.  Sketchup is the gold standard for a schematic sketch modeling program that allows for lots of right-brained intuitive designing and swapping in different options on the fly.  It has its limitations though when forced to make the transition to more detailed drawings in a more precise Revit-type environment, although with some planning and thought, they can generally be accommodated.

Autodesk tried to purchase Sketchup a few years back from Google, who had done an excellent job expanding it from its early days as a startup killer app from a company called At Last, but when it was purchased by Trimble, they began work on their own sketch program that would have the advantage of tighter integration and better back-and-forth compatibility with Revit.  That program is FormIt.

It’s got a lot of nifty drafting and modeling capability, some of which can feel more intuitive than even Sketchup at times.  Also, it features a lot more architect-oriented tools, such as a live updating FAR (floor-to-area ratio, often a crucial schematic number for zoning code purposes), and a built-in solar analysis tool.

I was playing around with the solar analysis tool when looking at a design recently as a quick way to identify exactly what angle would be the most beneficial for a roof looking to host solar panels.

Like Sketchup, it can quickly tie your project to a location and a satellite image, so I made sure the orientation was aligned.  Then, I laid out a series of square panels which I then rotated in 15-degree intervals until I had a full set.

formit_solaranalysis.png

I selected these panels and ran the analysis tool, which has two settings for a reading on any surface - monthly peak, which lets you set the month, and a yearly total.  The yearly total reads in kWh per area, which is perfect for plugging into a cost analysis spreadsheet for an energy model.

In know the Sefaira plug-in for Sketchup does this (and how), but it’s pricey, and the price point for Formit Pro is much more welcoming for small firms looking for a quick analysis in the early stages of design.