technology

Journal of a Revit Noob: 3 Reasons BIM Offers Architects an Opportunity for More Purposeful Design.

In the early 1980's, AutoCAD was introduced to the market and began facilitating construction documents for architecture and engineering firms, promising quicker drafting times. The days of hand drawings were coming to an end. Younger architects managed the drafting process while the more experienced architects designed, managed day-to-day coordination, and produced hand-sketches or red-lines. This created a generation of young architects who considered projects first in plan, then elevation, then details - as they were handed down to them to draft - this was my generation. So much of our energy was spent perfecting the minutiae of the drawing set and less time was given to the initial design concepts. I felt as if my generation only spent about 10%-15% on design and 85%-90% on construction drawings. This was before BIM. 

What I have realized in my first year of learning BIM in my practice is that we are spending about 50% of our time designing and only 50% of our time managing the construction set, which is yielding more thoughtful architecture. I can't believe I am saying this because one year ago, I told my best friend/architect buddy that there was no way I was learning the software. I am 14 years into my career. I'm almost to the point where I can hire interns. I really don't see the point. 

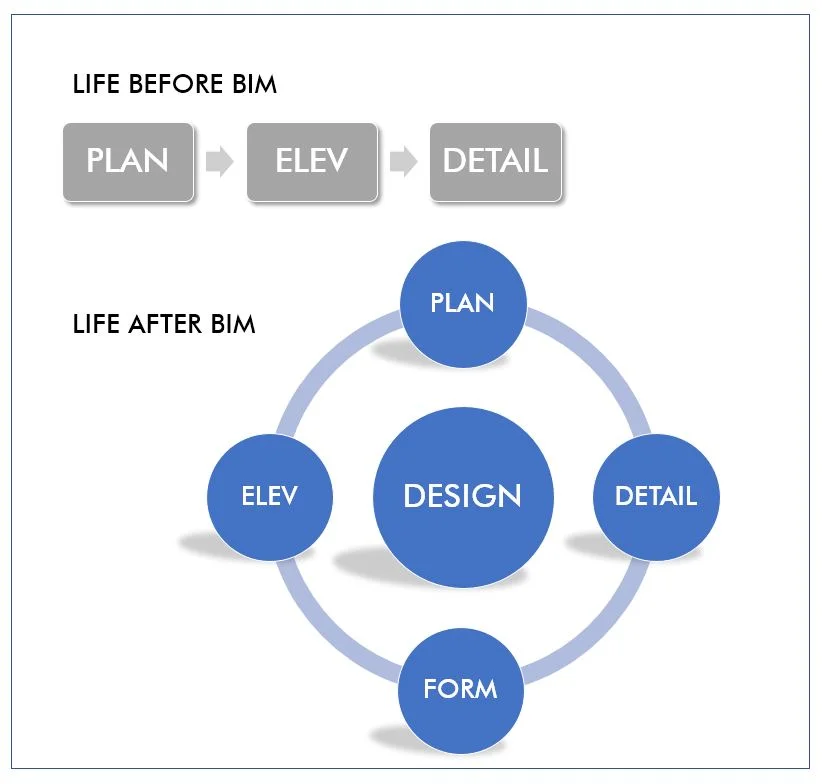
What I have learned in the past 8 months has been that I can have more purposeful projects. Instead of having to develop ideas first in plan format, then elevation format, then in detail, we design holistically, shifting all our energy from rote production tasks to developing our design's expression, character and forms in 3d. My husband and business partner told me this would be the result of BIM, but I didn't really believe him at the time. Now, I am totally on board and excited about our future projects. As a small design firm in a competitive environment, we need to work fast, cheap and well – to hell with the old saying that we have to pick two.  But we really all are capable of that in delivering a design product, by working smart!

Subscribe to the Studio BKA newsletter!

* indicates required

Journal of a Revit Noob: Small Project Challenges, Visibility & Graphics

Today, I am sharing one of the most important lessons in getting your Revit sheets to look like you want them to look using visibility graphics, phase filters and overrides (in the voices of Kim, the student and Ben, the teacher):

Student: The existing structure is printing too dark. How do I change the line weights so that the new structure appears darker and existing structure appears lighter? You know- line weight properties. 

Teacher: There's a few different ways to change the way your model will look, therefore changing the way your drawings look. Your brain is trying to make parallels from AutoCAD to Revit, so the first thing is stop making that comparison. Think of the elements as something abstract like a football team, the Saints!

Student: Noooo, the Saints lost last night...LSU Football! 

Teacher: Ok but you DO realize Revit has nothing to do with Football?

Student: Geaux Tigers!

Teacher: Moving on, let's say all the elements in our model are football players on the LSU football team. When looking at a sheet, we can control one view at a time (one player) or the entire model (the whole team). That's the difference between the "visibility/graphics override" and the "view template". 

Student: This is way more interesting now!

Teacher: The 'visibility/graphics override' box will be the first place you will visit when you are looking to set the characteristics of the lines, hatches, etc. I'll break down the categories (top tab buttons) in this property box. 

Model Category: All your elements in your model: walls, columns, floors, windows, etc. 

Annotation Category: Pretty much speaks for itself, it's where you'll control notes, section and elevation markers, grid lines, etc.

Analytical Model Category: You won't use this. Let's skip it!

Filters: This is the next level of control where you may want to control how a specific wall, specific floor, or specific window looks. Let's say this specific player is the kicker on the team. He calls himself a football player but his job is different, except for those occasional times when he has to tackle!

Student: You are pouring salt into those Saint-loss wounds!

Worksets: The control here only allows for visibility completely on or off. We can touch on worksets at another time.

Revit Links: You can think of this like an AutoCAD xref, I'm giving you that permission on this one. You'll link certain things like consultant drawings and ifc files to the main Revit model and this is where you will control how it will look. The way these files look can be customized exactly the same way you customize the way your model looks. It becomes very helpful when your structural engineer sends you his file that you'll link and his structural walls are showing up and overlapping yours; here you can control that visibility.

All of these can be controlled with a 'View Template' which makes setting up sheets quicker because you can apply its pre-modified settings to multiple views all at once. If you set up 'view templates' for your views on your sheets, when you click on the 'visibility/graphics' button, you will see grayed out tabs which means these categories are being controlled by the template. 

Student: This is clear but what about the 'existing structure' which is what I was having problems with. What's the easiest way of modifying the way it looks throughout the entire project. 'Existing structure' is not necessarily a model element, annotation, workset or link. 

Teacher: Glad you asked! Another way to manage the visibility characteristic of your model is by going to the 'manage' tab and clicking on 'phases'. Here you will be controlling the visibility based on the phase of the project. 'Existing Structure' is a phase. There are only three ways to set your phases: 'by category', 'not displayed' and 'overridden'. If all the 'existing structure' in your model wants to be purple, you can set that here as an override by phase. Set 'existing' override to purple and the whole model will show 'existing structure' as that color when that phase filter is used!

blog_vis6_r.jpg

Student: Geaux Tigers!

Teacher: Please stop. The third way to control the way your drawing will look is by a right-click option called 'override in view'. This command only changes the visibility locally not universally throughout the whole model. It's best if this isn't used with larger project teams, because only YOU remember when you made this call to change the way something looks in a view and could be confusing for team members trying to navigate through the model.  

Student: It's like putting graffiti on the model?

Teacher: Congrats, you passed Revit 7th grade!